In aesthetic medicine, outcome images do more than market services. They support consent, quality review, and consistent follow-up. For many practices, Juvederm before and after documentation becomes the shared reference point for patient expectations, injector coaching, and internal audits. The challenge is that “results” can change with lighting, swelling, and camera angles. Your workflow needs guardrails that make comparisons fair.
This guide is written for licensed clinics and healthcare professionals. It focuses on practical documentation and operations. It does not provide dosing, prescribing, or patient-specific treatment advice.
Key Takeaways
- Standardize photos to reduce “false change” effects.
- Document baseline anatomy and dynamic expression, not only wrinkles.
- Separate early post-treatment changes from settled results.
- Build a review path for unexpected outcomes and patient concerns.
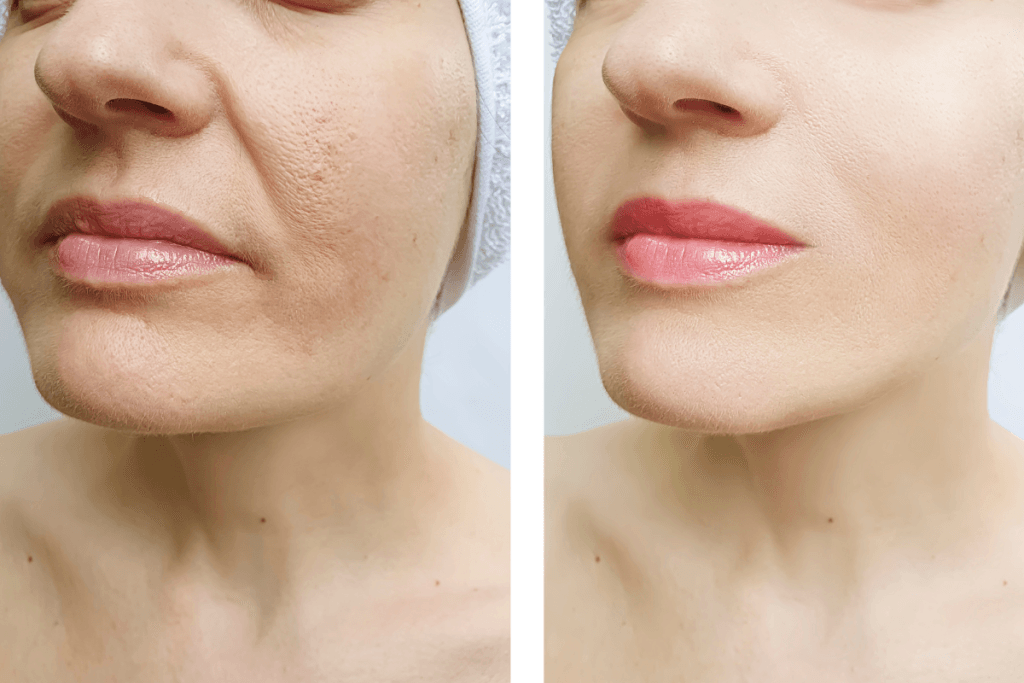
Juvederm before and after: What Clinics Should Look For
“Before and after” is often treated as a single comparison. In practice, it is a small dataset. The best comparisons show baseline, immediate post-procedure, and a settled follow-up. They also describe what changed: projection, contour, symmetry, and texture. This matters in areas like lips, cheeks, tear trough (under-eye hollow), and perioral lines.
Start by defining what a “good” comparison means in your clinic. A strong set answers three questions. Was the same patient position used? Was the same expression used? Was the same camera distance used? If those controls are missing, you may see apparent changes that are not treatment effects.
What Makes A Before/After Comparable
Comparable images reduce noise. Keep framing consistent so you can evaluate changes around the mouth, nose, and jawline. Use neutral facial expression first, then a standardized smile to assess dynamic folds. Include at least one oblique view, because shadows can hide or exaggerate contour. If you track lips, note hydration and recent cosmetic use, because gloss can mimic volume. For cheeks and midface, hair placement matters. A stray lock can change perceived malar (cheekbone) highlight.
Clinics also benefit from a shared language for outcomes. Instead of “better,” use descriptors such as “softened fold,” “improved lip border definition,” or “increased anterior projection.” That supports clearer documentation and more consistent peer review.
Access is typically limited to verified clinics and licensed healthcare professionals.
When patients ask for Juvederm before and after photos, consider showing images that match their facial shape and starting anatomy. A thin lip baseline behaves differently than a full lip baseline. A deep marionette fold (lines from mouth corners toward the chin) may reflect volume loss in the lateral chin, oral commissure, or prejowl sulcus, not just the line itself. Set expectations around “improvement” rather than “erasure.”
For broader context on why hyaluronic acid fillers are widely used, see Juvederm Treatments Popularity Explained.
Standardizing Photos And Chart Notes
Standardization turns images into clinical records. It also protects your team when staff changes. Write your photo protocol like a procedure. Specify camera, lens, distance, background, and lighting. Include how the patient is positioned and what expression is required.
Why it matters: Small photo differences can look like “filler migration” or “overfilling” when nothing changed.
Pair images with structured chart notes. Document the indication in plain language and clinical terms. Example: “marionette lines treatment for downturned oral commissures” and “volume support for perioral sulcus.” Record relevant history elements per your policy, and capture baseline asymmetry. If you do not document asymmetry before treatment, it will be attributed to treatment afterward.
| Element | Standard | What It Helps You Assess |
|---|---|---|
| Framing | Same crop each visit | Contour changes vs camera artifacts |
| Lighting | Fixed light position | Shadow-driven “wrinkle” appearance |
| Views | Front + both obliques | Symmetry and projection |
| Expression | Neutral + standardized smile | Static vs dynamic lines |
| Timestamp | Visit stage labeled | Early swelling vs settled appearance |
Photo consent and storage rules vary by jurisdiction and payer environment. Keep your process consistent with local privacy requirements and your EHR policy. If your practice uses separate media storage, document where images live and who can access them.
For product context within a broader category, teams often start at Dermal Fillers and then narrow to Hyaluronic Acid Fillers when comparing similar materials.
Course, Longevity, And Follow-Up Timing
Patients frequently ask how long does Juvederm last, and they often expect a single number. In real-world practice, duration varies by product type, treatment area, patient metabolism, and technique. Movement-heavy areas around the mouth can appear to “fade” sooner than low-mobility areas. Hydration, inflammation, and lifestyle factors can also affect how results look in photos.
Plan your follow-up cadence around documentation goals rather than marketing. A same-day image can be useful for immediate contour documentation, but it may also capture swelling and procedural redness. A later image often better reflects a settled appearance. Define what your clinic calls “settled” in your protocol, and label photos accordingly in your chart.
When you use Juvederm before and after comparisons for internal training, separate early and later images into different folders or tags. That prevents staff from using immediate photos to “promise” a long-term look. It also reduces disputes when a patient compares their day-one photo to a later baseline.
For a high-level durability discussion that is useful during counseling, see How Long Do Lip Fillers Last. For product family selection conversations, clinics may also reference Restylane Vs Juvederm when discussing material similarities and differences.
Treatment-Area Patterns: Lips, Cheeks, Under-Eyes, Marionette Lines, Jawline
Most “visible results” questions are area-specific. Patients searching juvederm before and after lips usually care about border definition, projection, and symmetry. Those searching juvederm before and after cheeks tend to focus on lift and midface contour. Under-eye searches often reflect concerns about tired appearance, shadowing, or hollowness, and these photos can be especially sensitive to lighting.
It helps to group your outcome reviews by anatomical goal. For lips, document the vermilion border (lip edge), Cupid’s bow, and oral commissures. For cheeks, note malar apex position and anterior cheek projection. For jawline and chin, document mandibular angle definition and profile balance, especially in male patients where goals can differ.
Perioral And Under-Eye Nuances
Perioral concerns often overlap. “Marionette lines before and after” images can look inconsistent if you do not control smile and mandibular position. A slight clench changes the fold depth. When patients ask about marionette lines botox before and after, clarify in your documentation whether the goal was muscle modulation versus volume support. Under-eye images are even more variable. A small change in overhead lighting can create or erase a shadow. Consider documenting the room setup and using the same chair height and chin angle each time.
Many clinics maintain “1 mL” teaching sets, because patients search 1 ml lip filler before and after healed and expect a universal transformation. In your internal library, label images by baseline anatomy and visit stage. Avoid implying that a certain volume guarantees a certain look.
For cheek-focused reading, see Juvederm Voluma Lift And Contour. For broader lip filler selection discussions, Types Of Lip Fillers can support staff education.
Men’s searches are often framed differently. Terms like male jawline filler before and after, men chin filler before and after, and face filler men before and after usually point to shape, angle, and profile rather than “plumpness.” Build male-specific photo sets with consistent beard and hair grooming notes, because facial hair changes perceived edges.
Inventory choices vary by clinic protocol and local regulation. If your team keeps example product references in training materials, keep them factual and non-promissory, such as Juvederm Ultra or Juvederm Volbella With Lidocaine.
Stock is sourced through screened distribution partners to support product authenticity.
When Results Look “Gone Wrong”: Red Flags And Review
Searches like marionette lines filler gone wrong reflect a real clinic burden: anxiety after treatment. Some concerns are perception-driven. Others require prompt clinical assessment. Your documentation approach can reduce unnecessary escalation by distinguishing expected short-term appearance changes from true complications.
Start with the non-clinical drivers that change appearance. Swelling can alter symmetry. Bruising changes shadow patterns. Makeup and skincare can create shine that reads as “lumps.” Even dehydration can increase creasing around the mouth. When patients send selfies, ask for standardized angles and neutral lighting so your review is based on comparable inputs.
Quick tip: Create a “same wall, same light” selfie instruction card for post-visit messages.
Still, you need a defined pathway for urgent concerns. In charting, differentiate cosmetic dissatisfaction, delayed swelling, nodules (palpable lumps), and skin color changes. Record the timeline and any associated symptoms. Follow your established clinical protocols and the official product labeling for management steps. If you suspect a serious adverse event, treat it as time-sensitive and escalate per your medical director’s policies.
- Inconsistent photos lead to disputes.
- Unlabeled timelines confuse staff reviews.
- Missing baseline asymmetry increases blame risk.
- Overreliance on selfies distorts contour.
- Unclear escalation steps delay assessment.
When you use Juvederm before and after images in a QA meeting, focus on process factors first. Ask whether positioning, expression, and labeling met protocol. Then assess whether the documented goal matched the observed change. This order keeps reviews constructive and reduces hindsight bias.
Clinic Workflow: Sourcing, Storage, Traceability, And Cost Context
Operational rigor supports safer care and cleaner records. Keep a simple workflow that links product receipt to the patient chart. Policies vary, but many clinics use a verify → document → receive → store → administer → record model. Document lot numbers, expiration dates, and where the unit was stored, consistent with labeling and local requirements.
MedWholesaleSupplies focuses on serving licensed medical practices with brand-name products obtained via vetted distributors. In a procurement process, that usually means you should be ready to provide license and facility documentation, and you should keep supplier invoices aligned with your internal inventory logs. If you operate with US distribution, make sure receiving staff know where to file temperature logs if your product labeling requires them.
Documentation Checklist For Procurement And Charting
- Account verification file for suppliers.
- Receiving log with lot and expiry.
- Storage location recorded per policy.
- Patient chart links to lot number.
- Adverse event pathway documented internally.
- Photo consent and access controls set.
- Training set labels match visit stage.
Cost conversations are part of operations, even in clinical settings. Searches like juvederm cost, marionette lines filler cost, and how much does juvederm cost for lips often reflect patients trying to estimate scope. Rather than quoting generalized figures, document what drives variability: treatment area complexity, number of units used (mL), adjunct services, clinician time, and follow-up structure. For men, questions like male cheekbone filler cost and male jawline filler cost may also involve different contour goals and photo standards.
Keep “cost” notes separate from clinical notes when needed for compliance. Also avoid letting a single dramatic Juvederm before and after example set expectations for every patient. Use a range of baseline types, and keep your image library updated with consistent consent and retention rules. If you rely on reliable US logistics for restocking, still maintain a safety buffer for scheduled clinic days, because backorders and allocation can occur across the industry.
For cross-brand education that can help staff discuss options without hype, see Teosyal And Juvederm Review. If your protocols include multiple HA lines, you may also reference a neutral comparator example such as Restylane 1 mL With Lidocaine in training materials.
Brand-name units may include traceable lot and expiration details when available.
Authoritative Sources
For safety frameworks and patient counseling language, defer to regulators and specialty organizations. These sources can also help your team align documentation with known risk categories and labeling expectations.
Further reading can live inside your staff training hub. Many practices also browse a trend-and-education feed like Beauty Trends to keep terminology consistent across front desk and clinical teams.
This content is for informational purposes only and is not a substitute for professional medical advice.