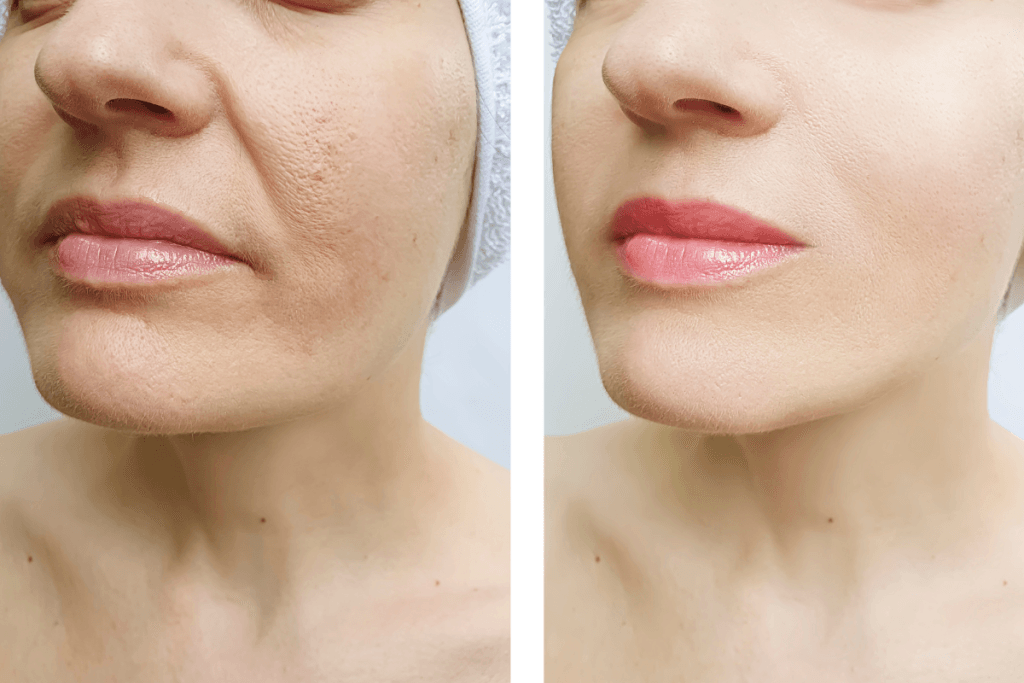
Juvederm before and after images are most useful when clinics treat them as clinical documentation, not just marketing assets. A fair comparison should show the same patient position, lighting, facial expression, camera distance, and visit stage. This matters because swelling, shadows, makeup, hydration, and angle changes can all make results look better, worse, or different from the actual treatment effect.
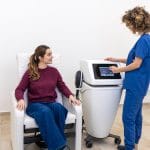
This article is written for licensed clinics, injectors, practice managers, and healthcare professionals. It focuses on documentation, photo workflow, consent, follow-up review, and operational controls. It does not provide dosing, prescribing, injection technique, or patient-specific treatment advice.
Key Takeaways
- Standardize every image: Control lighting, distance, background, expression, and head position.
- Label visit stages: Separate baseline, immediate post-treatment, and settled follow-up images.
- Document baseline asymmetry: Record pre-existing contours before they become post-treatment concerns.
- Use area-specific criteria: Lips, cheeks, under-eyes, marionette lines, and jawline need different review points.
- Build escalation pathways: Define how your team reviews unexpected symptoms or patient concerns.
Juvederm Before And After Images: What Clinics Should Evaluate First
A strong before-and-after set answers three basic questions: what was the starting anatomy, what changed, and whether the comparison is technically fair. If those questions are not answered, the images may mislead staff and patients.
Start with the baseline. Record anatomy at rest before focusing on lines or volume changes. Note asymmetry, skin texture, facial proportions, previous procedures when known, and dynamic movement. Dynamic movement means how the face changes during expression, such as smiling, pursing, or speaking. This is important around the lips, nasolabial folds, oral commissures, and marionette lines.
Then label the timing. Immediate post-procedure photos may show contour changes, but they can also show swelling, redness, bruising, or needle-entry marks. Later follow-up images usually reflect a more settled appearance. Your protocol should define which image type is used for clinical review, internal training, and external consented galleries.
Why it matters: A small change in lighting or chin angle can look like a treatment result.
When patients ask to see Juvederm before and after photos, choose examples that match their starting anatomy and treatment area. A thin lip baseline, mature perioral skin, deep marionette fold, or flatter midface contour may respond differently from another patient’s baseline. Use image sets to support expectation-setting, not to imply a guaranteed outcome.
For related staff education on the product family and why hyaluronic acid fillers are widely used, see Juvederm Treatments Popularity. Clinics that want a broader operational frame can also review Juvederm For Clinics.
How To Make Photo Comparisons Clinically Fair
Comparable photos reduce noise. The goal is not to make every image look perfect; it is to make each visit comparable enough for fair interpretation. This requires a written protocol that staff can repeat across rooms, shifts, and providers.
Specify camera type, lens or device settings, background, distance, lighting setup, and patient position. If your clinic uses a mobile device, define the device model or camera mode where possible. Use the same chair height and mark the floor for patient and photographer placement. Even small changes can alter perceived jawline definition, cheek projection, or under-eye shadow.
Expression control matters as much as equipment. Capture a neutral face first. Then capture standardized expression views, such as a gentle closed-mouth smile or full smile, if relevant to the treatment area. Avoid coaching patients differently between visits, because different expressions can exaggerate or soften folds.
Core Photo Views To Standardize
Most clinics benefit from a repeatable set of views. A full-face frontal view helps evaluate symmetry. Right and left oblique views help assess projection and contour. Profile views may be useful for chin, jawline, nose-lip balance, and midface support. Close-up views can help with lips or perioral lines, but they should supplement, not replace, full-face context.
Use the same framing at each visit. If a baseline image includes the full lower face, the follow-up image should not crop tightly around only the lips. Cropping changes the viewer’s perception of scale and can make a subtle change look larger than it is.
Documentation Language That Reduces Ambiguity
Chart notes should describe the observed change using neutral, anatomical language. Instead of writing “looks better,” document “improved vermilion border definition,” “softened marionette fold depth,” “increased midface projection,” or “more balanced lower-face contour.” These terms are easier to review during quality assurance and reduce subjective interpretation.
Also record what did not change. If baseline asymmetry remains present after treatment, that should be clear in both photos and notes. If skin texture, pigmentation, or static etched lines remain visible, document that the treatment goal focused on contour or volume support rather than complete line erasure.
| Documentation Element | Standard To Define | What It Helps Assess |
|---|---|---|
| Framing | Same crop and distance | True contour change versus scale distortion |
| Lighting | Fixed light position | Shadow-driven folds or under-eye hollows |
| Expression | Neutral plus standardized smile | Static anatomy versus dynamic movement |
| Head position | Same chin angle | Jawline, chin, and cheek projection |
| Visit label | Baseline, immediate, or follow-up | Swelling versus settled appearance |
For teams building formal image libraries, Before And After Documentation provides a closer look at clinical photo standards.
Timing, Longevity, And Result Interpretation
Clinics should separate immediate visual change from settled assessment. Same-day images can support procedural documentation, but they may not represent the appearance that staff should use for long-term comparison.
Patients often ask how long Juvederm injections last. A single answer is rarely appropriate because duration can vary by product, treatment area, patient factors, metabolism, and movement. Areas with frequent motion, such as the lips and perioral region, may appear to change sooner than lower-mobility areas. Hydration, inflammation, weight change, and normal aging can also affect how photos look over time.
Set a clinic-wide definition for each stage of documentation. For example, your system may distinguish baseline, immediate post-treatment, early follow-up, and later maintenance review. The exact timing should follow your clinic protocol and clinical judgment. The key is to label every image so staff do not compare an immediate post-treatment photo with a much later settled image without context.
When using Juvederm before and after images for internal training, keep immediate images separate from settled images. This reduces the risk that staff use swelling-enhanced early images as examples of expected final appearance. It also helps front-desk and consultation teams explain why a day-one appearance may not match later review photos.
For cheek-specific photo interpretation, clinics may find Cheek Photo Review useful. For formulation and workflow context, Juvederm Voluma Cheeks can support education around midface documentation.
Treatment-Area Patterns To Capture Consistently
Different facial areas need different photo priorities. A lip series should not be evaluated the same way as a cheek, under-eye, marionette line, or jawline series.
For lips, document the vermilion border (the lip edge), Cupid’s bow, upper-to-lower lip balance, oral commissures, and projection from the side. Note lip hydration and recent cosmetic use when relevant. Gloss can reflect light and mimic fullness, while dryness can make fine lines look more prominent.
For cheeks, document the malar region, midface support, and anterior projection. Hair placement matters here. A lock of hair can change perceived cheekbone highlight or obscure shadows. Oblique views are especially useful because frontal photos can flatten contour changes.
Under-eye images require strict lighting control. A small shift in overhead light can create or erase a tear trough shadow. Tear trough refers to the hollow or groove between the lower eyelid and upper cheek. Document chair height, chin position, and gaze direction if your clinic performs under-eye assessments.
For marionette lines, capture the lower face at rest and during a standardized smile. Marionette lines are folds extending from the mouth corners toward the chin. They may reflect several factors, including perioral volume loss, oral commissure position, chin support, and prejowl contour. A slight clench or different mandibular position can deepen the fold and distort comparison.
For male jawline and chin documentation, include grooming notes. Beard length, stubble, and hairline changes can sharpen or blur perceived edges. Use profile and oblique views to assess lower-face balance without reducing the review to a single frontal image.
Clinics that keep product references in training materials should use them sparingly and factually. Examples may include Juvederm Ultra, Juvederm Voluma With Lidocaine, or Juvederm Volbella With Lidocaine. Product pages should not replace clinical labeling, local policy, or professional judgment.
When Results Look Concerning Or Unexpected
Unexpected appearance changes should be reviewed through a defined pathway. Some concerns are caused by photo artifacts, swelling, bruising, makeup, dehydration, or expression differences. Others may need prompt clinical assessment.
Start by separating image-quality issues from clinical concerns. Patient-sent selfies can be helpful for triage, but they are often distorted by lens distance, overhead lighting, facial expression, and camera angle. Ask for neutral lighting and standardized views when your clinic policy allows remote review. Document that the image source differs from clinic photography.
Quick tip: Create a same-wall, same-light selfie instruction sheet for post-visit messages.
Chart the concern using specific terms. Distinguish cosmetic dissatisfaction, expected short-term swelling, bruising, palpable nodules, delayed swelling, color change, pain, or other symptoms. Record onset, duration, associated symptoms, and whether the patient supplied photos. Follow your medical director’s protocol and the official product labeling for assessment and escalation.
Clinics should treat possible serious adverse events as time-sensitive. Do not rely on photo comparison alone when symptoms suggest a medical concern. Escalation steps should be known by clinical staff, front-desk staff, and any team member who receives patient messages.
- Photo mismatch: Re-check angle, expression, and lighting.
- Timeline confusion: Confirm immediate versus settled image stage.
- Baseline asymmetry: Compare against pre-treatment notes.
- Selfie distortion: Request standardized review images.
- Symptom concern: Escalate according to clinic protocol.
During quality assurance meetings, review process before outcome. Ask whether the photo set followed protocol, whether consent was documented, and whether the clinical goal matched the observed change. This approach keeps reviews constructive and reduces hindsight bias.
Clinic Workflow For Storage, Consent, And Traceability
A dependable Juvederm before and after workflow connects images, consent, product records, and follow-up notes. The goal is a traceable record that can support clinical review, patient communication, and internal training.
Photo consent should be explicit and easy to audit. Separate consent for clinical records from consent for education, training, website galleries, or social media use. Local privacy laws, professional rules, and EHR policies vary, so your process should reflect your jurisdiction and legal guidance.
Image storage also needs access controls. If photos live outside the EHR, record where they are stored, who can access them, how files are named, and how long they are retained. Staff should not move images into informal folders, personal devices, or messaging apps unless your policy specifically permits that pathway.
Procurement and traceability records should link product receipt to the patient chart according to clinic policy. Many practices use a simple verify, document, receive, store, administer, and record model. Record lot numbers, expiry dates, storage location, and patient chart linkage where applicable.
MedWholesaleSupplies serves licensed clinics and healthcare professionals as a B2B supplier, with brand-name products sourced through vetted distribution channels. In practice, clinics should still maintain their own supplier files, receiving logs, and internal inventory checks.
Clinic Documentation Checklist
- Photo protocol: Camera, lighting, distance, and views are defined.
- Consent record: Clinical and promotional permissions are separated.
- Baseline notes: Asymmetry and starting anatomy are documented.
- Visit labels: Timing is clear on every image set.
- Product traceability: Lot and expiry are linked per policy.
- Storage controls: Access and retention rules are documented.
- Escalation pathway: Staff know how to route urgent concerns.
For broader operational reading, teams can browse Clinic Operations. For category-level product navigation, the Dermal Fillers collection can help staff locate related resources without turning clinical documentation into a product comparison exercise.
Cost Context Without Overpromising Results
Cost questions often appear beside before-and-after searches, but clinics should keep financial estimates separate from clinical interpretation. A dramatic image should not become a proxy for expected scope, product volume, or treatment planning.
When discussing cost drivers, use neutral categories. Treatment area complexity, clinician time, number of syringes or units used, adjunct services, review appointments, and local practice policies can all affect fees. Avoid presenting generalized figures as if they apply to every patient. Also avoid implying that one syringe produces a standard transformation across lips, cheeks, marionette lines, or jawline treatments.
For documentation, note whether financial discussions occurred through administrative channels or clinical consultation. Some clinics keep cost estimates outside the medical note, depending on compliance requirements and EHR setup. Whatever your process, make sure staff do not use Juvederm before and after images to promise a specific volume-to-outcome relationship.
A balanced gallery includes varied baselines, ages, facial shapes, and treatment goals where consent allows. This helps staff explain that outcomes depend on anatomy, product selection, technique, and follow-up evaluation. It also reduces the risk that a single highly visible case becomes the patient’s expected endpoint.
Authoritative Sources
Use regulator and specialty-organization resources to support safety language, consent materials, and staff training. Product labeling and local professional standards should guide clinic-specific protocols.
- FDA dermal filler safety overview
- American Society of Plastic Surgeons filler safety information
- American Academy of Dermatology filler information
Well-run image workflows make outcome review more reliable. Standardized photos, clear chart notes, consent controls, and traceability records help clinics interpret results fairly and respond to concerns consistently.
This content is for informational purposes only and is not a substitute for professional medical advice.