PDO thread lifting sits in a busy space between injectables and surgery. If your team is evaluating what are PDO threads for facial contouring workflows, you need more than marketing terms. You need a plain explanation of mechanism, materials, thread designs, and the operational realities that affect safety and documentation.
This guide is written for licensed healthcare professionals and clinic operations teams. It focuses on how thread lifts are commonly approached in practice, what can go wrong, and what to standardize before expanding services. Details vary by device, jurisdiction, and training pathway, so align your protocols with local requirements and the manufacturer’s instructions for use (IFU).
Supply access is typically limited to verified licensed clinical accounts.
Key Takeaways
- Define the goal: repositioning support vs subtle collagen remodeling.
- Match design to anatomy: mono, spiral, and cog behave differently.
- Plan for variability: longevity and “lift” depend on tissue and technique.
- Standardize risk controls: asepsis, documentation, and follow-up pathways.
- Procurement matters: traceability and vetted sourcing reduce avoidable risk.
what are PDO threads: Clinic-Facing Overview
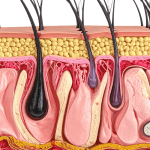
PDO threads are absorbable (resorbable) suture-like filaments placed in the subdermal plane to support tissue and, in some approaches, to create a modest mechanical repositioning effect. “PDO” refers to polydioxanone, a polymer used in certain absorbable sutures. In aesthetics, thread placement is often discussed under the umbrella of a “thread lift,” though techniques and intended outcomes vary widely.
In clinic conversations, it helps to separate three ideas that patients often blend together: a temporary “lift,” contour refinement, and longer-term changes from tissue response. Many practices position threads as an option when patients want less downtime than surgery, accept subtler change than surgical lifting, and are not ideal candidates for volume replacement alone. For a broad view of SKUs and common naming conventions, your team can reference a curated PDO Threads Category as a starting point for terminology, not as a substitute for IFU review.
Inventory for these procedures should come through screened distribution channels to support authenticity checks.
How Do Thread Lifts Work in Tissue?
Clinicians often describe two overlapping effects: an immediate mechanical change and a delayed biologic response. The mechanical component depends on design features (for example, barbs) and on how well the thread engages supportive tissue. The biologic component is usually framed as a wound-healing cascade with collagen remodeling. In real-world outcomes, patient factors and placement strategy can dominate both effects.
When teams ask “how do pdo threads work” during service planning, they are usually trying to predict durability and complaint patterns. A useful internal framing is to treat threads as a device-based procedure with a learning curve, not a simple consumable. That perspective tends to improve consent language, complication pathways, and staff training plans. For clinical background reading, see Facial Rejuvenation With Thread Lifts.
What are PDO threads made of?
Polydioxanone is a synthetic, absorbable polymer that has been used in medical sutures. In aesthetic threads, the base material is typically paired with a needle or cannula delivery system. The thread may be smooth (mono) or engineered with a surface geometry such as twists or barbs. Your purchasing and clinical teams should treat “PDO” as a material class, not as a guarantee of identical performance across brands. Needle gauge, thread length, barb pattern, packaging, and IFU instructions can differ and may affect handling, placement feel, and risk profile.
Longevity, comfort, and downtime: setting realistic expectations
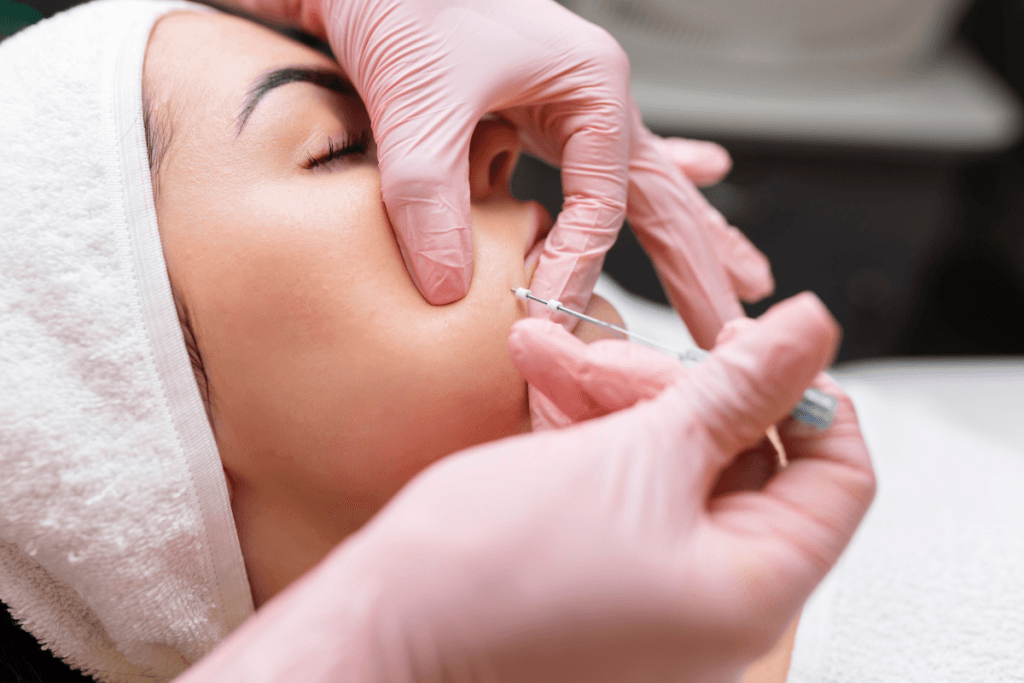
Patients frequently ask how long do pdo threads last and whether they are permanent. In general terms, PDO material is designed to resorb over time, so the implanted filament is not permanent. The visible aesthetic effect may last longer than the physical presence of the thread, but duration varies with technique, tissue quality, and the degree of mechanical engagement achieved. It is more accurate to frame outcomes as variable and maintenance-based, rather than as a one-time structural correction.
Another predictable question is “do pdo threads hurt.” Discomfort can range from mild pressure to brief sharp sensations, depending on approach and anatomy. Downtime is often driven by bruising, swelling, and tenderness rather than by functional limitation. For clinics, this is less about promising a timeline and more about creating consistent post-procedure instructions, documentation, and a reachable escalation pathway when symptoms exceed expected ranges.
Thread Designs and Selection Considerations
Once your team understands the goal (support, contour, or subtle repositioning), design selection becomes more logical. This is also where cost variability enters the discussion. Even without quoting pdo threads cost, clinics can map the main drivers: thread type, quantity used per area, procedural time, adjunct consumables, and the need for touch-ups. If you publish pricing, keep it in ranges and tie it to assessment and treatment planning, not to a single “per thread” number.
To avoid stocking mismatched SKUs, create a shortlist tied to your most common indications and staff competencies. Many practices start by standardizing one smooth option and one lifting-focused option. For technique-oriented context, MINT PDO Threads Overview is a useful companion read for discussing minimally invasive lifting concepts (while still deferring to each device’s IFU).
Quick comparison table (high level)
| Thread style | Common operational purpose | Typical trade-offs to plan for |
|---|---|---|
| Mono (smooth) | Support and texture-focused protocols | Subtle visible change; inventory may be overused without a plan |
| Spiral / screw | Localized support where added bulk is desired | Palpability risk; technique sensitivity in thinner tissue |
| Cog / barbed | Mechanical engagement for repositioning | Higher stakes if placement is off-plane; asymmetry complaints |
| Multi-directional variants | Vector control and contour refinement | More complex learning curve; harder troubleshooting |
Example SKUs can help your team discuss form factor without turning the discussion into a brand comparison. For instance, a smooth thread format is represented by Intraline PDO Mono M3038, a spiral format by Intraline Spiral, and a lifting-focused format by Intraline Cog. Keep your internal education centered on IFUs, anatomy, and complication management rather than on catalog descriptors.
Why it matters: Standardizing a limited set of designs reduces preventable handling errors.
Risks, Side Effects, and When Things Go Wrong
Threads are often marketed as “minimally invasive,” but the risk surface is real. Common early issues include bruising, swelling, tenderness, and temporary contour irregularities. Reported complications can include dimpling, visible or palpable threads, thread migration, asymmetry, extrusion (thread exposure), and infection. The likelihood and severity depend on operator training, patient factors, and adherence to aseptic technique and IFU constraints.
When clinicians ask are pdo threads dangerous, the most useful answer is contextual. Any implantable device placed through skin carries risk. The operational response is to control what you can: patient selection criteria, sterile field discipline, documentation, and early recognition. For a deeper dive that can support staff training discussions, refer to Thread Lift Risks And Challenges.
Recognizing infection symptoms and other red flags
Teams should align on what pdo thread infection symptoms can look like in general terms: increasing localized pain, progressive redness, warmth, swelling, drainage, fever, or a worsening skin change along a thread path. Patients may also report a focal “hot spot” or a tender nodule. Because aesthetic complications can mimic normal healing early on, the key is a documented, time-based reassessment approach and a low threshold to escalate evaluation when symptoms worsen rather than improve.
Also plan for noninfectious concerns that drive callbacks: puckering, dimpling, contour step-offs, and dissatisfaction tied to expectation mismatch. The phrase “thread lift gone wrong photos” is common online, and patients may arrive with alarming images. Use that moment to review variability, explain what constitutes an urgent concern versus a cosmetic irregularity, and reinforce that images on the internet may be mislabeled, edited, or de-identified without clinical context.
- Overpromising lift: mismatch between goals and achievable change.
- Too many vectors: complexity outpaces staff experience.
- Thin-skin sites: palpability and visibility complaints rise.
- Inconsistent asepsis: small breaks can drive big problems.
- Weak documentation: harder follow-up, harder root-cause review.
Many disadvantages of thread lift discussed in reviews are process failures, not just device limitations. Create a standard complication note template, and agree on who takes the first call. Pair that with clear internal escalation rules and a documented handoff to higher-acuity care when needed.
Clinic Workflow and Procurement Considerations
Once a clinical lead approves scope and training, operations determines whether the service runs safely at scale. Start with a workflow that connects device sourcing to clinical documentation. Include lot tracking, expiration checks, and a clear definition of who can open sterile packaging and when. If your clinic is adding threads alongside injectables, cross-train staff on instrument handling and sharps safety to avoid “hybrid room” drift.
When practices revisit what are PDO threads during procurement, it is often because SKUs proliferate quickly. A structured formulary prevents last-minute substitutions and reduces charting gaps. For adjacent supply planning, Cannulas And Needles Wholesale outlines purchasing considerations that also apply to thread adjuncts.
Some suppliers focus on brand-name products intended for licensed clinicians, sourced through vetted distributors.
Quick tip: Require IFU access before adding any new thread SKU.
Operational checklist (adapt to your policies)
- Verify credentials: confirm licensure and authorized facility type.
- Confirm IFU: archive current instructions and contraindication language.
- Lot tracking: record lot/expiry in chart or inventory system.
- Storage controls: keep clean, dry, and access-limited inventory.
- Room setup: standardize sterile field supplies and counts.
- Photo protocol: consistent lighting, angles, and consent documentation.
- Escalation plan: after-hours coverage and referral pathways documented.
- Incident review: track complaints and update technique training.
Cost conversations belong here too. Instead of quoting how much are pdo threads, document the operational inputs: staff time, room utilization, consumables, and follow-up burden. That helps you compare service lines without anchoring on a single device line-item. If you distribute from US distribution channels, confirm how that affects lead times and lot traceability in your own inventory controls.
Finally, align your marketing and clinical notes with reality. Thread lift before and after images should be standardized, timestamped, and obtained with appropriate consent. Consistency protects the clinic, and it also makes outcomes review more meaningful for quality improvement.
Authoritative Sources
For regulatory and device verification context, start with the FDA medical device databases overview.
For a general procedure overview from a major specialty organization, see the American Society of Plastic Surgeons thread lift summary.
Further reading: review your selected thread IFUs alongside internal adverse-event trends and photo documentation standards.
This content is for informational purposes only and is not a substitute for professional medical advice.