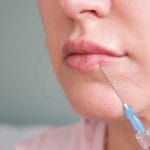
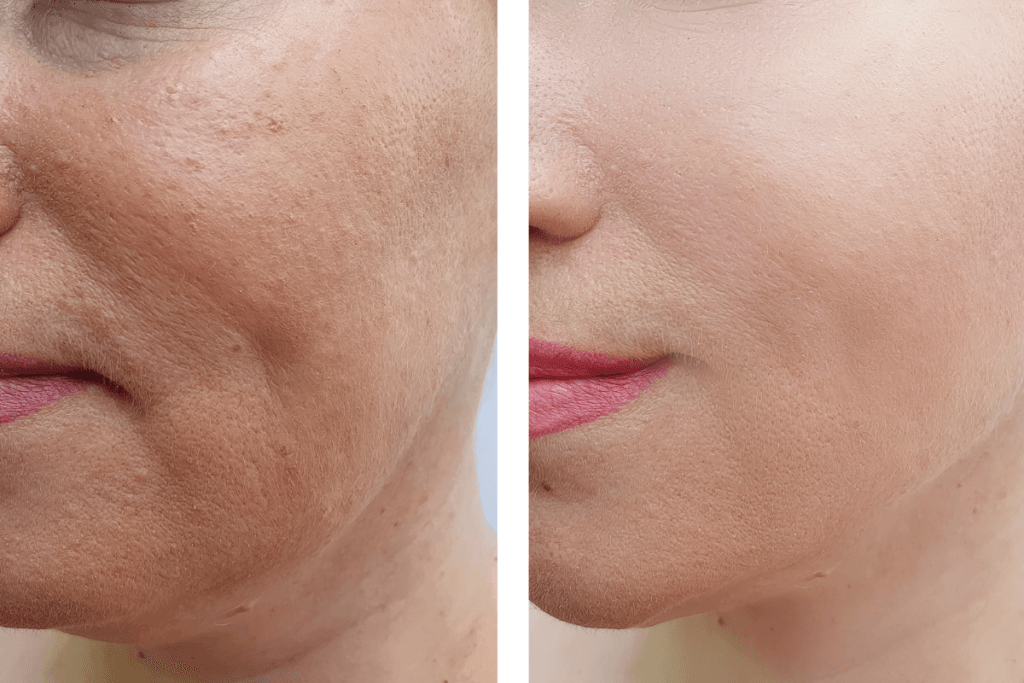
Juvederm before and after cheeks photos should be reviewed as clinical comparison images, not as casual beauty shots. For licensed clinics, the most useful photo sets show whether midface volume, cheek projection, symmetry, and transition zones changed under controlled conditions. They also help teams document consent, product traceability, and follow-up observations in a repeatable way.
This matters because small changes in lighting, head position, expression, or camera distance can make cheek filler outcomes look stronger, weaker, or less balanced than they are in person. A clear photo protocol protects chart quality and supports more consistent communication between injectors, staff, and patients.
Key Takeaways
- Control the setup: match lighting, distance, background, and facial expression.
- Read anatomy first: assess cheek apex, midface contour, symmetry, and blending.
- Avoid photo traps: watch for smile lift, head tilt, makeup, and lens distortion.
- Document traceability: record labeled product name, lot, expiration, site, and follow-up images.
- Set realistic language: describe ranges of change, not guaranteed lift or facial reshaping.
How To Read Juvederm Before And After Cheeks Images
The strongest cheek filler comparisons answer one question first: did the midface contour change in a way that matches the treatment plan? In photos, that usually means looking for malar eminence projection (cheekbone prominence), anterior cheek fullness, and smoother transition from the lower eyelid to the cheek.
A front view can show overall balance, but it may understate lateral projection. Oblique views often show cheek shape better, yet they can exaggerate improvement if the angle changes. Profile views help reveal forward projection and whether the cheek blends naturally into the lower face.
When reviewing juvederm before and after cheeks sets, separate anatomical change from photographic effect. A brighter light source can create a stronger highlight across the cheek. A slight smile can make the midface appear lifted. A lower camera angle can lengthen the lower face and alter how the cheeks read.
Why it matters: Consistent image capture helps staff distinguish treatment response from camera artifacts.
Clinics that need a broader product-class orientation can use the Dermal Fillers category as a browsing point for related filler education. Keep product selection and patient suitability within clinician assessment, label guidance, and local scope-of-practice requirements.
Midface Anatomy That Photos Can And Cannot Show
Cheek photos show surface contour, not the full tissue story. The visible result reflects bone structure, fat compartments, skin quality, facial ligaments, and how the filler integrates with surrounding tissue. Images cannot confirm injection plane, exact product distribution, or vascular status.
Practical review starts with visible landmarks. Common reference points include the cheek apex, tear trough region (under-eye hollow), zygomatic arch (cheekbone ridge), and submalar hollow (the concavity below the cheek). A natural-looking outcome often appears as a smoother gradation between these zones, rather than a single high point.
Age and baseline anatomy strongly influence how an after photo looks. In older adults, skin laxity and volume deflation may coexist. The visible improvement may appear as softer shadowing or better contour continuity, not a dramatic cheekbone change. After substantial weight loss, the cheeks, temples, and perioral area may all contribute to the baseline appearance.
Cheek support can also affect how adjacent areas look. Some patients describe less tiredness around the eyes or a softer nasolabial transition, even when the cheek is the main treatment area. Staff should still document the target anatomically, such as midface volume restoration or cheek contour support, instead of implying that untreated regions were directly corrected.
Product Context For Cheek Photo Review
Juvederm products are hyaluronic acid dermal fillers, and some formulations are commonly discussed in midface contouring workflows. Hyaluronic acid is a water-binding gel material used in soft tissue filler products. Formulations differ in gel behavior, firmness, cohesivity, and intended treatment areas, so photo interpretation should stay tied to the product label and clinician technique.
Many clinics reference Voluma when discussing cheek support and midface contour. For team education on this specific treatment area, Juvederm Voluma For Cheeks offers a related clinical orientation. When charting a case, staff should still record the exact labeled product used, rather than relying on shorthand terms from consultation notes.
For procurement and documentation teams, a product listing such as Juvederm Voluma With Lidocaine can help reconcile internal inventory records with chart entries when that exact item is used by the clinic. This should not replace the official label, instructions for use, or clinician judgment.
Clinics that compare multiple fillers in training should avoid oversimplified visual claims. A comparative resource such as Radiesse Vs Juvederm Voluma can support broader staff discussion about filler categories, but patient-specific treatment planning remains a clinical decision.
Photo Standards For Reliable Cheek Comparisons
A reliable photo protocol makes before-and-after interpretation more consistent across providers and locations. The goal is not to make every patient look the same. The goal is to make each patient’s baseline and follow-up images comparable.
Use a defined view set for every cheek filler case. A typical series includes frontal, right oblique, left oblique, right profile, and left profile images. Keep the head position neutral, the lips relaxed, and the eyes forward. If your clinic captures smiling views, label them separately and do not compare them with neutral baseline images.
| Photo Element | Clinic Standard To Define | Reason It Matters |
|---|---|---|
| Views | Frontal, both obliques, both profiles | Shows projection, symmetry, and contour from multiple angles |
| Lighting | Same source, direction, and intensity | Reduces false highlights and shadow changes |
| Camera distance | Fixed floor mark or measured setup | Limits distortion between visits |
| Lens setting | Consistent focal length where possible | Avoids wide-angle facial distortion |
| Expression | Neutral face, relaxed mouth | Prevents smile-related lift from skewing review |
Quick tip: Add a short photo-conditions note to the chart for each image set.
Makeup, tanning products, skin treatments, and facial hair changes can also affect comparison. These details may not invalidate the photo set, but they should be noted when they influence contour, shadow, or skin tone. When teams use images for staff education, de-identification and consent procedures should follow clinic policy and applicable privacy rules.
Clinical Interpretation: Common Questions Behind The Photos
Most follow-up questions about juvederm before and after cheeks images fall into four areas: suitability, expected visual change, volume assumptions, and duration. Clinics can answer these topics more safely by keeping the discussion anatomical and label-aware.
Can This Filler Be Used On Cheeks?
Cheek use depends on the specific product, jurisdiction, label, injector training, and clinical assessment. Some products in the same brand family may be positioned for different facial areas. Staff should avoid treating a brand name as a single interchangeable product category.
For internal staff education across formulations, Juvederm For Clinics can help organize product-family discussions. In patient records, use the exact product name from the packaging and the relevant clinical documentation, not only the brand family.
How Long Do Cheek Results Last?
Duration can vary by product, treatment area, patient factors, and follow-up timing. Photos taken soon after treatment may show swelling or early tissue response. Later photos may better reflect stable contour, although individual results still vary.
For photo review, avoid using a single after image as proof of durability. Instead, record the visit date, interval from treatment, patient-reported concerns, and clinical observations. If the clinic uses standardized follow-up windows, document any deviation so future reviewers understand the context.
Is A Certain Number Of Syringes A Lot?
Syringe count alone does not predict the final appearance. Facial size, baseline volume loss, cheek structure, skin thickness, and treatment goals all affect how much change is visible. Two people may receive the same product volume and show very different photographic outcomes.
Staff should avoid promising that a set number of syringes will create a specific cheek height or lift. A safer consultation phrase is: “The visible change depends on baseline anatomy and the treatment plan.” That wording supports expectation setting without implying a guaranteed result.
Will Cheek Filler Lift Jowls?
Midface support may change how lower-face shadows appear, but cheek treatment is not the same as direct jowl correction. Jowling involves skin laxity, ligament support, fat distribution, and jawline structure. Photos may show a softer lower-face transition in some cases, but that should not be framed as a predictable lift.
When patients bring mixed galleries showing cheeks, jawline, lips, or marionette lines, clarify the anatomical target. This helps prevent a cheek photo comparison from being judged against a different treatment area.
Documentation And Clinic Workflow
Photo documentation works best when it is linked to consent, product traceability, and inventory controls. Before images should be captured before treatment whenever possible. After images should be stored with the same care as other clinical records.
Keep medical consent separate from marketing or educational image permissions. A patient may consent to clinical photography for charting while declining external use. That distinction should be clear in your record system and staff workflow.
- Verify identity: confirm the patient and visit date.
- Record consent: separate charting use from marketing use.
- Capture baseline: use the standard view set before treatment.
- Chart product: note labeled name, lot, expiration, and site.
- Store images: use access controls consistent with policy.
- Repeat conditions: match follow-up photos to baseline setup.
MedWholesaleSupplies serves licensed clinics and healthcare professionals in a B2B supply context. For practices sourcing brand-name medical products through verified supply channels, documentation should still be reconciled locally against receiving logs, lot records, storage requirements, and the product’s instructions for use.
If your team needs a deeper photo-record framework, Juvederm Photo Documentation provides a related clinic-focused reference. Use it alongside your own policies, privacy obligations, and injector training standards.
Comparing Cheek Photos With Other Treatment Areas
Cheek filler images should not be judged by the same visual rules used for lips, tear troughs, or marionette lines. The cheek is a structural midface zone. Small changes may improve facial balance while remaining subtle in isolated photos.
Lip photos often emphasize border definition, volume distribution, and symmetry at rest and animation. Under-eye photos are highly sensitive to lighting and skin texture. Jawline photos depend on neck posture and mandibular angle. Cheek photos sit between these categories because they show both projection and transitions.
Patients may bring examples labeled as Juvederm before and after cheeks, before and after fillers around mouth and cheeks, or Voluma before and after. These labels may not reflect the same product, treatment plan, or anatomy. During review, ask what feature the patient is noticing: cheek height, under-eye shadow, nasolabial transition, or lower-face heaviness.
For broader brand-context reading, Juvederm Before And After discusses visible result interpretation across treatment areas. Use cross-area examples carefully so staff do not imply that one product or technique applies uniformly to every region.
Risk, Safety, And Escalation Language
Before-and-after photos can support communication, but they do not replace clinical assessment or adverse-event screening. Dermal filler procedures have known risks, including swelling, bruising, lumps, infection, inflammatory reactions, and rare but serious vascular complications.
Clinics should use calm, direct language when discussing concerning symptoms. Severe pain, skin color change, visual symptoms, or rapidly worsening findings require urgent clinical assessment according to training, clinic protocol, and product labeling. Staff should know who reviews these concerns and how they are escalated.
Reversibility discussions should also be measured. Some hyaluronic acid fillers may be managed with hyaluronidase in appropriate clinical circumstances, but outcomes and suitability vary. Do not present reversal as simple, guaranteed, or risk-free.
Authoritative Sources
Use official labeling, regulator materials, and specialty training standards as the source of truth for product-specific use, warnings, and documentation requirements. These resources are useful starting points for general safety context:
In practice, the best juvederm before and after cheeks documentation combines standardized photography, anatomical charting, product traceability, and clear follow-up notes. Use photo sets to support review and communication, while keeping clinical judgment, consent, and safety protocols at the center of care.
This content is for informational purposes only and is not a substitute for professional medical advice.